 |
 |
|
 |
 |
Your Source for GD&T Training and
Materials | |
|
Back to GD&T Tips |
You Can Still Use Your Calipers, If You Really
Want To.
|
|
I constantly hear that
where profile of a surface is used, you have to use a
coordinate measuring machine or some other sort of high-tech
inspection equipment. The assumption is that if the part had
been toleranced with the old plus/minus approach, rather than
geometric tolerancing, the part would be much easier to
inspect with simple equipment such as calipers. Of course this
is nonsense. A caliper measurement is a one-dimensional
measurement of a three-dimensional feature whether it is
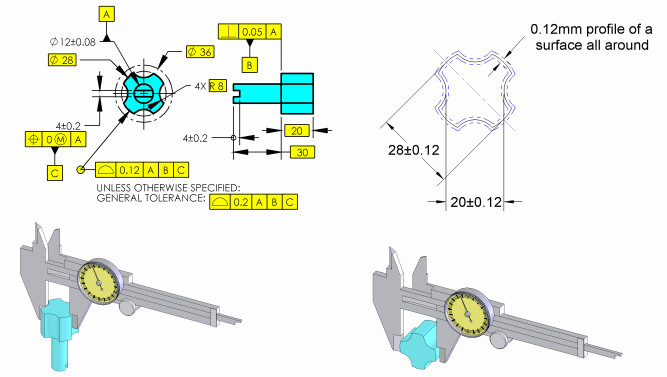
toleranced with GD&T or not. Calipers may be used on this
part, for instance, to do a quick check of features with a
profile tolerance applied. Since the profile of a surface
tolerance is relative to the datum reference frame established
by A, B and C, an accurate, 3-D inspection of these features
would require establishing the datum reference frame and
measuring from the datums. Here are a couple of quick caliper
type measurements that could be made..
|

|
 |
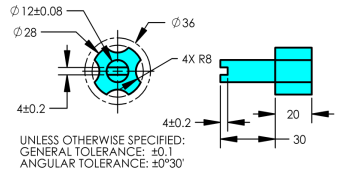
Imagine trying to inspect
the R8 dimension if it had been toleranced without
GD&T as is shown here. Try to determine if the
center of the 4X R8±0.1 are on the Ø36±0.1 and at the
implied 90°±0°30'. By the way, how centered does the Ø36
have to be on the Ø28. There are many ways to
"interpret" this drawing. However, the drawing with
GD&T has "one clear meaning." Bottom line, if you
want to do an inadequate job of inspecting a part using
calipers-go ahead, regardless of how the part is
toleranced. | |
|
Back to GD&T Tips | |
|
|
|