Simplify Your GD&T
Consider revising your general
title block tolerance! You can clean up the drawing and move
toward the new technology of minimally dimensioned or
dimensionless drawings. As companies mature with Geometric
Dimensioning and Tolerancing, more and more of the dimensions
on a drawing need to be basic dimensions. Basic dimensions are
used to indicate the desired location or orientation of
features. These basic dimensions indicate the ideal geometry
of the part and are not toleranced. The tolerance applies to
the features that are located or oriented by the basic
dimensions. In other words, any basic dimensions or dimensions
with a tolerance specified on the drawing do not use the
general title block tolerances. On this drawing, for example,
none of the dimensions shown use the general
tolerances.
|

|
|
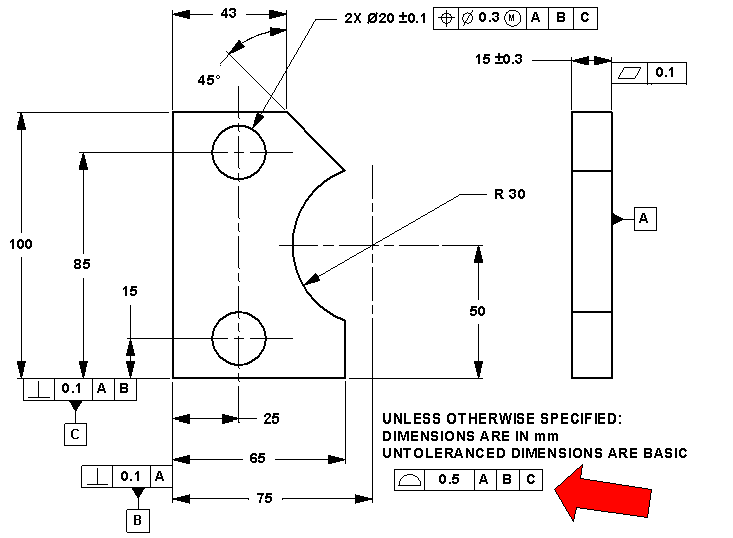
A better approach
is shown on the revised drawing below. By stating that
ALL UNTOLERANCED DIMENSIONS ARE BASIC and specifying a
general profile tolerance relative to a datum reference
frame, several improvements have been made to the
drawing. |
-
all locating and
orienting dimensions are relative to a datum reference
framework
-
tolerance
accumulation is reduced/avoided compared to
conventional tolerancing
-
the features are
being controlled rather than imaginary centers in
space that no one can reproducibly
measure
(see December
Tip)
-
no need for all
of those boxes around the dimensions
|
 |
|
Many companies
have taken the next step which is to have dimensionless
or minimally dimensioned drawings by making the CAD
model BASIC with a general profile tolerance and only
specifying datums, position tolerances on features of
size and tighter profile tolerances where needed on the
drawing or CAD
file. | |